4 Ways to add IKEA Smart Devices to Apple HomeKit

One of the most regrettable things in smart device experience is to have an incompatible device. For Apple users, the chances are very high. Especially the ones who expect to add IKEA devices to Apple HomeKit. Anyway, the problem is not to last any longer. Let's find “How to add IKEA devices to Apple HomeKit”.
Possible ways to add IKEA devices to Apple HomeKit
If you want to control IKEA devices with Home App and Siri, you need to add IKEA smart devices to Apple HomeKit first. Here’re the best and possible ways to add your IKEA smart home devices to Apple HomeKit.
- AddToHomeKit [Recommended Solution]
- ATH Bridge [Affordable solution]
You can use a third-party software application that can be run on a computer or on your iPhone. let’s see what these method are.
AddToHomeKit
IKEA AddToHomeKit is an easy way to add your IKEA smart devices to Apple HomeKit. Ever wondered how to control your IKEA with the Home App and Siri voice control? This is an ideal solution for you. You can find this awesome tool using the button below.
ATH HomeKit Hub
ATH Hub is one of the most affordable hardware solutions for adding IKEA devices to Apple's HomeKit. With ATH bridge, you can easily connect your IKEA smart devices to HomeKit and control them with Siri, and the Home app. Also, this small device act as a IKEA HomeKit bridge.
Here are some of the benefits of using ATH Bridge to add IKEA devices to the Home app:
- Affordable: Most affordable hardware solutions for adding IKEA devices to Home app
- Easy to use: Even if you're not a techie, you'll be able to get up and running quickly.
- Versatile: Athom Hub is compatible with over 2,000 devices
Homebridge
Homebridge is the best and most effective method for adding any smart home device to Apple HomeKit. It is a lightweight NodeJS server that allows you to integrate non-Homekit compatible smart devices with Apple HomeKit.
HOOBS solution
Another hardware solutions for adding these devices to HomeKit is HOOBS. If you want easy-to-use home automation, HOOBS is the perfect option for you. More than 2000 gadgets are connected to HomeKit through it.
TRADFRI Gateway
You need a web-connected hub to control and manage Ikea’s Smart Plugs, Lighting products, Electric Blinds, and more. IKEA HomeKit Gateway allows you to control and manage all of these devices using the IKEA App or a smart home assistant such as Apple HomeKit, Amazon Alexa, and Google Assistant.
Setting up the Trådfri Gateway HomeKit is as simple. Also, you can select which voice assistant you want to control your Ikea devices during the initial setup. Further, the it works as an Ikea Home kit Hub and Tradfri remote Home Kit. But, Tradfri Gateway is not compatible with Matter protocol. So, you won't able to create IKEA Tradfri Matter integration.
Let’s see how to add your IKEA device to Apple HomeKit using the Tradfri smart hub.
New Dirigera Hub
This new Dirigera smart hub will be Matter supported. The Matter is a new smart home interoperability standard. It promises to enable device communication across all ecosystems and manufacturers.
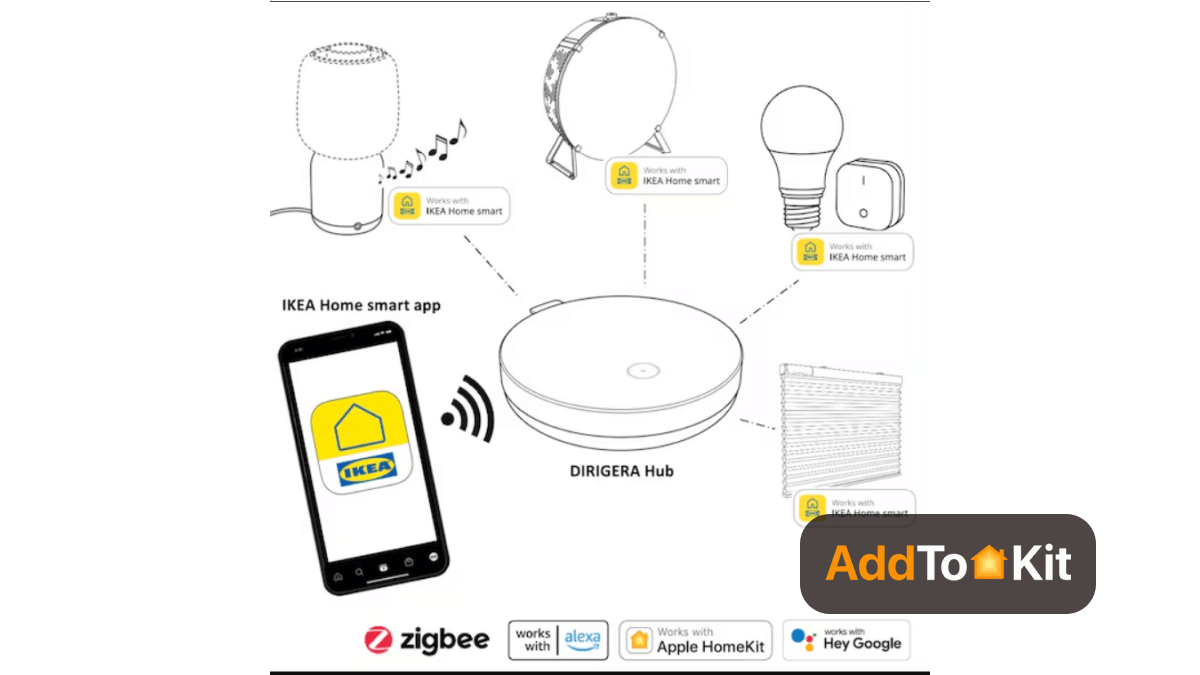
If you want to add any IKEA Matter Smart Devices to any Smart Home System, you can find it here.
Any IKEA product plugged into the hub can be controlled through any ecosystem that supports Matter. Ecosystems like Apple, Google Assistant, Amazon Alexa, and more have committed to supporting Matter.
Want to know more about Dirigera Hub? Let’s find more about the Matter support IKEA HomeKit Hub.
We have given three device methods to add your IKEA devices to Apple HomeKit. If you are interested in IKEA HomeKit, you can choose the best solutions to improve your Apple Home Kit IKEA and add any devices to HomeKit. Also, if you're a Alexa user, you'll be able to create IKEA Dirigera Alexa and IKEA Drigera Google Home integration.
IKEA and HomeKit compatibility
Most IKEA smart home devices don’t support Apple HomeKit. But, don't worry! Your IKEA smart devices support Apple HomeKit when you use TRAD FRI Gateway. Also, you can use third-party software applications and simple device solutions.
- TRADFRI is compatible with all major smart home platforms including Apple HomeKit.
- IKEA has introduced a new Matter-ready Smart Home Hub.
- You can integrate IKEA Apple using this new Dirigera Smart Home Hub.
Now, let’s make IKEA HomeKit compatible with these top solutions.
Apart from IKEA devices, if you're interested in the eufy smart home devices, you can learn more about adding eufy devices with Apple HomeKit using this guide.
Then, we'll dive further into how to add the devices to Apple HomeKit using Homebridge.
Troubleshooting Tips
- Ensure Compatibility
- Only IKEA devices with Matter support or an IKEA Dirigera hub work natively with the Home app.
- If using IKEA Trådfri Gateway, it does not support the Home app anymore; use Matter or a Dirigera hub instead.
- Check Network & Hub Connection
- Ensure the IKEA Dirigera hub is powered on and connected to your Wi-Fi router via Ethernet.
- Make sure your iPhone and Dirigera hub are on the same 2.4GHz Wi-Fi network (avoid 5GHz if setup fails).
- Restart your router, IKEA hub, and iPhone to clear connection issues.
- Use the IKEA Home Smart App
- Open the IKEA Home Smart app and update firmware for the hub and devices. Try resetting the hub if issues persist: Press and hold the reset button for 5+ seconds until the light blinks.
- Scan the Correct Code
- Use the Apple Home QR code on the IKEA Dirigera hub (not individual devices).
- If scanning fails, enter the code manually in the Home app.
- Reset & Re-add Devices
- Remove the device from IKEA Home Smart app, reset it, and re-add it before trying Apple Home.
- To reset an IKEA bulb, turn it on/off six times in a row until it blinks.
- For IKEA switches/remotes, press and hold the pairing button for 10 seconds.
- Try Bridge Alternatives
- Use a third-party bridge with the appropriate plugin.
- Check iOS & Home App
- Ensure your iPhone is updated to the latest iOS version.
- Try removing the IKEA hub from the Home ap and re-adding it.
If your IKEA device doesn't support Matter, you can:
Adding IKEA devices to the Apple Home app using Homebridge
- Install Homebridge on Mac/PC
- Install IKEA Plugin
- Edit the configuration file
- Run the plugin
- Bridge to HomeKit
- Then, go to the Home App on your Apple devices.
- Scan the QR code of Homebridge UI.
- Finally, you can control the devices on Apple HomeKit.
Before installing the necessary and apprpriate Homebridge plugin, you need to install HomeBridge on Mac/PC. Check this article to install Homebridge on your device easily.
First you need to install homebridge-ikea-tradfri-gateway using the below code:
$ sudo npm install homebridge-ikea-tradfri-gateway -gAlso, you can try this code if you’re having a permission problem
$ sudo npm install homebridge-ikea-tradfri-gateway -g --unsafe-permConfigure your JSON file with the below platform:
{
"bridge": {
"name": "Trådfri",
"username": "AA:22:3D:E3:CE:57",
"port": 51826,
"pin": "031-45-123"
},
"description": "This is an example configuration file",
"platforms": [
{
"platform": "Ikea Trådfri Gateway",
"name": "Ikea Trådfri Gateway",
"securityCode" : "this-is-found-on-the-back-of-the-gateway",
"expose": ["lightbulbs", "outlets", "blinds"]
}
]
}
This module automatically determines the IP address of the IKEA portal. If for some reason you need to access a specific portal then merge the following into the code. Go to the ~/.homebridge/config.json file.
{
...
"platforms": [
{
...
"host": "ip-address-of-ikea-gateway"
}
]
}
Credit - https://github.com/meg768/homebridge-ikea-tradfri-gateway
First, navigate to the directory using: cd..
Then, run the ikea plugin using:
homebridge -D -U ./config/ -P ./Now, you can control your IKEA devices with Apple HomeKit after connecting homebridge to HomeKit.
Troubleshooting Tips for IKEA HomeKit HomeBridge
- Check HomeBridge & Plugin Status
- Ensure Homebridge is running and the IKEA plugin. (e.g,
homebridge-tradfri-gatewayis installed and up to date. - Restart HomeBridge and check logs for errors.
- Verify IKEA TRÅDFRI Gateway Connectivity
- Make sure the IKEA TRÅDFRI Gateway is powered on and connected to your network.
- Check the IKEA Home Smart app to confirm devices are working properly.
- Restart the gateway by unplugging it for 30 seconds and plugging it back in.
- Ensure HomeKit Code & Pairing Are Correct
- If IKEA devices are not appearing in HomeKit:
- Check Network Issues
- Ensure Homebridge and the IKEA Gateway are on the same network.
- Restart your router if devices are not responding.
- If using HomeKit remotely, make sure Home Hub (Apple TV, HomePod, or iPad) is working.
- Update Firmware & Software
- Update IKEA TRÅDFRI firmware via the IKEA Home Smart app.
- Update Homebridge and installed plugins.
- Review Homebridge Logs
- Look for error messages related to IKEA devices.
- Reinstall the IKEA Plugin
- Remove the HomeBridge IKEA plugin:
- Reinstall it:
- Restart HomeBridge.
- Reset IKEA Gateway
- Press and hold the link button (⚫) for 10 seconds.
- Wait for the LED to blink.
- Set up the gateway again in the IKEA app and Homebridge.
- Remove and re-add them in Homebridge.
- Make sure the HomeKit pairing code in the plugin configuration is correct.
homebridge -D
If the IKEA devices are still unresponsive:
npm uninstall -g homebridge-tradfri-gateway
npm install -g homebridge-tradfri-gateway
If all else fails, reset the IKEA TRÅDFRI Gateway:
If you own HomeKit incompatible Smart Devices like Ring, you can find our How to add Ring Devices to HomeKit article to make them compatible with Apple HomeKit. Let’s find another way to add your IKEA devices to Apple HomeKit.
How to connect IKEA Dirigera to Apple HomeKit?
Let’s see how to add your Ikea Tradfri Gateway with HomeKit. You need to have an iPhone, iPad, or iPod Touching running iOS 8 or later.
- First you need to install the Ikea Tradfri app on your mobile device and open it.
- Then, Tap settings in the top right corner, and next you need to go to the integrations.
- After that, you need to select Apple HomeKit. You will see the Ikea Tradfri Siri connection code for Apple HomeKit.
- You need to enter it in the Apple Home app, so take note of that.
- Once you get the Homekit code, you need to add a new accessory or Device to your HomeKit setup.
- First of all, you need to open the Apple Home App.
- Then, you can choose Add Accessory or tap the plus symbol.
- After that, Tap Allow if you're prompted to add a device.
- Take a picture of the HomeKit or QR code on the item or document using a camera.
- If you have an iPhone 7 or later, hold your phone near the device for a few seconds and look at the symbol below instead.
- You will be prompted to enter the details about the device, including its location in the room and the name you want to give it.
- Enter these details to make it more accessible in the future.
- When you’ve got all the details entered, you will need to tap done.
Get HomeKit code
Add Accessory
Integrating to HomeKit with HOOBS
Ikea Tradfri Gateway Plugin for HOOBS exposes the devices connected to a Tradri Gateway to HOOBS. This HOOBS plugin extracts all light bulbs, outlets, and blinds in use by the IKEA Gateway. So, it can convert your smart home devices into IKEA Home Kit devices.
This plugin support:
- Standard White Bulbs
- RGB Bulbs
- Warm white bulb with temperature control
- Outlets
- Blinds
You must first connect to your router using an Ethernet cable. Next, you need to plug in the power cord and wait for two to three minutes for HOOBS to boot into the Box.
You should now launch the browser on your computer and go to http://HOOBS.LOCAL. The Home app on your iPhone can be launched after creating your HOOBS account.
Then tap Add accessory to scan the QR code. You need to tap Add again after that, and it has been successfully added. Then click on Plugins and install the Ikea plugin. Select the search option IKEA and click "Install Plug-in."
Add this configuration code:
[
{
"platform": "Ikea Trådfri Gateway",
"name": "Ikea Trådfri Gateway",
"securityCode" : "this-is-found-on-the-back-of-the-gateway",
"host": "ip-address-of-ikea-gateway",
"expose": ["lightbulbs", "outlets", "blinds"]
}
]
How to connect IKEA gadgets to Siri and Apple Home App
- First you need to open the Ikea Home smart app.
- Then make sure the router is turned on and the Ethernet cable is plugged into the back of the router.
- Now, scan the QR code at the bottom of the Ikea gateway.
- Before connecting anything to HomeKit, you need to add the Ikea smart devices you have after registering the gateway.
- This app is still required for setup every time you buy a new device. But after everything is configured correctly, you can control everything from home or with Siri.
- Tap the Settings button at the top right when everything is on. After selecting Integrations select Apple HomeKit.
- The next step is to scan the underside of the gateway again instead of scanning for the QR code, check for the HomeKit code. It's a set of numbers on a separate HomeKit sticker.
- Select the home you want to add the hub to and then follow the on-screen instructions to set everything up.
- You will be asked to select whether you want to add each device registered in the Ikea app to the Home app and to provide a name for it. Keep your names short and descriptive so Siri can easily say them.
- When you're done, open the Apple Home app and your new devices should be visible in the Home area.
- Then, you can control these like any other original feature, and remember that a long tap on any item will bring up more controls, including the Settings button for that particular device.
- Here, you can choose which rooms or scenes each device belongs to and set up unique automation for each device. Now you can access all your technology from one place, or ask Siri to turn off the lights.
New launcher- Matter supports IKEA HomeKit Hub (DIRIGERA Smart Hub)
The DIRIGERA hub is the heart of a smart home system. It enables you to connect and manage your smart home appliances using the IKEA Home smart app. Imagine being able to wake up, set the lights, open the blinds and listen to music without getting out of bed.
All of their smart products work independently. Further, The DIRIGERA Hub needs a Wi-Fi network and connects to your router with the supplied cable.
By connecting them to the hub:
- Control and personalize your home in new ways
- When you combine two or more items, you can access additional features and functionality.
- You can use shortcut buttons, the app, or schedules to manually trigger scenes, like when you want to quickly turn off all the lights in your smart home before you leave in the morning.
Also, a new and better replacement for the TRADFRI gateway will be this Matter-ready smart hub. And, it is coming this November for around $59.
Home Assistant IKEA Dirigera Integration
You're able to add your IKEA Dirigera Hub to Home Assistant. First, you need to remove the Dirigera bridge from the Apple Home app, then it becomes discoverable in Home Assistant. Also, you should have a notification in the Home Assistnt app/Web interface that it found a new HomeKit controller.
But, you will not be able to create integration of Homey IKEA Dirigera with Homey Pro Bridge as Homey is not supported.
HomeKit-compatible devices
IKEA added HomeKit support to some devices. So, You can make IKEA's most affordable devices even more powerful. The following IKEA Products support HomeKit.
01. IKEA Tradfri Shortcut Button
Tradfri Shortcut Button act as dedicated controllers. Keep a shortcut button by the bed. So, you can turn on the lights, draw the shades, and play your favourite wake-up song with the push of a button. So, it's time to create the right light to start your morning with IKEA HomeKit Button.
Control your smart home with:
- IKEA Home Smart App
- Remote Controls
- Shortcut Buttons
- Voice commands
- Motion
02. IKEA Motion Sensors
You can use IKEA Motion Sensor to automatically turn on/off up to 10 lights. So, you can make your home more safe. It upgraded to firmware 1.13.21. So, you can see it in the Apple Home App.
- Can set functions for day or night mode
- Lights automatically turns off
- Has a maximum range of 10 metres
Best IKEA smart home devices
At a glance, we can find there are several best Ikea smart home hubs, the best Ikea smart lights, the Best IKEA smart blind, the Tradfri Motion sensor, and many more best Ikea smart home gadgets like smart plugs and smart speakers. And, you can integrate these solutions with Apple HomeKit easily.
01. Tradfri Gateway
You need a web-connected hub to control and manage IKEA’s many smart plugs, lighting products, electric blinds, and more. It allows you to control and manage all of these devices using the Ikea app or a smart home assistant such as Apple HomeKit, Amazon Alexa, and Google Assistant. Also, it is powered by Zigbee.
Setup the Tradfri Gateway is simple:
- Connecting the hub to your router.
- Downloading the Ikea smart home app.
- Follow the on-screen steps to activate the portal.
- Select which voice assistant you want to control your Ikea devices during the initial setup.
02. Tradfri LED bulbs
Want to brighten up your home? Tradfri LED E12 450 lumen is the best solution for you. Also, it is the best IKEA Bulb and you can integrate with Apple HomeKit using Tradfri Gateway or any other solutions.
Using the Tradfri remote and the Home app, it allows you to choose:
- Between nine different colours.
- Many warm and cool tones.
03. IKEA Fyrstur Blackout Roller Blinds
You can control how much sunlight you’re letting into your home using your smartphone or IKEA remote control. Like competitive smart blind manufacturers, IKEA's selection of smart blinds is the best roller blinds with integrated battery pack.
Once connected to your Tradfri Gateway or any compatible smart hub you can operate your blinds with the Home Smart App or voice assistant.
04. Tradfri Smart Plug
Wish your coffee maker, desk fan, and dehumidifier were all automatic? Then, you can buy Tradfri Smart Plug which is the best smart plug for your IKEA smart home. These individual smart plugs cost $10 each and are offered in several IKEA Smart Home bundles.
Also, you can use physical on/off switches and timers to operate up to 10 different smart plugs at once connected to your Tradfri gateway or another hub.
05. Symfonisk Table Lamp
Symfonisk Table Lamp is Airplay 2-compatible and works as the best IKEA Smart Speaker. Also, it allows you to wirelessly transfer music from your mobile device to the speaker if you're using Apple HomeKit. Although Symfonisk lacks compatibility for Alexa or Google Assistant, you can still operate the speaker with Alexa using a Sonos One or Beam.
- Control one item, group, room, or all at once.
- Both the Ikea Home Smart and Apple Home apps allow you to apply actions to shortcut buttons with cumulative results.
- Easy to integrate the IKEA Shortcut Button HomeKit.
06. IKEA Zigbee
Now this is not a device but rather a protocol that allows HomeKit compatibility.
IKEA's smart lighting products utilize Zigbee Light Link technology, allowing compatibility with other Zigbee-certified devices. You can easily integrate additional TRÅDFRI bulbs, light panels, and sensors into your system using the TRÅDFRI app and gateway. Moreover, IKEA's smart lighting supports voice control through Apple HomeKit and Amazon Alexa, making it versatile for smart home setups.
IKEA Alexa
Adding IKEA to Alexa can be done by enabling the Amazon Alexa integration in the IKEA smart home app and the IKEA smart skill in the Alexa app. Doing so would allow you to control your IKEA devices with Alexa voice commands.
How to Add IKEA to Alexa
- Navigate to the IKEA home app >> Setting menu.
- Follow the given instructions to activate Alexa.
- Go to the Alexa app and enabke the IKEA Home smart skill.
- Discover the devices by saying, "Alexa, discover my devices" or with the Alexa app.
Troubleshooting
If you cannot connect, try disabling and reenabling the integration in both apps. You have to also make sure that your devices are within 9 meters of a compatible Echo.
Conclusion
As we mentioned above, IKEA devices can be added to Apple HomeKit with simple solutions. My suggestion is to go with AddToHomeKit as it is easy to use. Also, it removes the limitation of Homebridge. And, if you want to go with an affordable solution, you can use Athom Bridge to add your IKEA devices to Apple HomeKit easily.
FAQs
No. But, don't worry! You can make your IKEA devices compatible with a simple third-party solution like AddToHomeKit.
If you want to add your IKEA to your Apple Home, you can use AddToHomeKit solution. It support guides to add your IKEA to Apple Home.
- Open the IKEA Tradfri App
- Tap settings
- Go to integration
- Select Apple HomeKit
- Then, you'll see the IKEA Trafri connection code
- Enter it in the Apple Home App
Yes. You can use Tradfri with the remote steering device. (remote control, wireless dimmer or motion sensor). So, you can easily create IKEA Dimmer HomeKit integration.
No. You can add your IKEA devices using a Tradfri gateway. But, you can also use AddToHomeKit or thrid-party solutions.
You can add your IKEA bulbs to HomeKit with a bridge like Athom bridge. So, you can control IKEA light bulb HomeKit with Siri.
Yes. Now you can enjoy the benifits of IKEA smart blinds Apple HomeKit integration. If you're prefer to go with app solution, you can go with AddToHomeKit. Also, you can choose Athom bridge as an affordable device solution.
- IKEA Dirigera Aqara
- IKEA Dirigera Tuya
- IKEA Dirigera Zigbee


