How to add Vivint Smart Devices to HomeKit

Apple HomeKit has now become the most trusted partner of every smart home. It’s just because HomeKit enables the use of other devices securely and allows voice commands.
Different manufacturers produce many home security-based smart devices. One such famous brand is Vivint.
Vivint has smart home security devices that are easy to integrate with the smart home. It is also able to control all the accessories within a single application. There are so many benefits that Vivint can provide to its users in home security.
These devices can work with so many smart home ecosystems. But someone could have worries about if Vivint works with Apple HomeKit. Well, yes, it does work with HomeKit. But there’s a little workaround that should be done.
There are some methods that you can connect Vivint with HomeKit.
AddtoHomeKit - Best Solution
The easiest way to integrate your non-HomeKit devices with Apple HomeKit is by using Vivint AddToHomeKit. Simply follow the straightforward steps to manage your Vivint devices through the Apple Home app and control it with Siri voice commands.
Pros and Cons of AddtoHomeKit
Pros
- App solution
- Requires low effort
- Less time-consuming
Cons
- Must activate an account before getting started
- Require a little bit of coding knowledge
You can even create a Geeni HomeKit and a Leviot HomeKit with this!
Follow these steps to integrate vivint devices with Apple HomeKit using Addtohomekit
- Visit the AddtoHomeKit official page
- Select the preferred ecosystem
- Select the preferred solution
- Select the preferred Operating System
- Select and install the HomeBridge Plugin
- Now select the Activation Package
- Then, Follow the on-screen instructions as mentioned
You can also add ADT devices to HomeKit, add Eufy devices to HomeKit and even add Sonos devices to HomeKit or other incompatible devices using AddtoHomeKit.
Get to know about Vivint Apple HomeKit
Vivint has been among the best and most popular smart home security solutions. They provide state-of-the-art security systems for their customers.
The unique thing about Vivint smart home security system is that it can be completely customized. They have cameras, sensors, thermostats, lighting and more that can be fixed according to different needs.
The app also comes with a friendly user interface, and it is incredibly intuitive. With this platform, you can even control and monitor your home ecosystem from anywhere.
Vivint and Apple HomeKit aren't compatible with each other yet. Vivint and Apple HomeKit integration can do many things than we know. Let's find more about Vivint HomeKit integration.
Connecting Vivint with HomeKit
There are some methods and steps that you need to follow to let Vivint and other HomeKit compatible devices work with Apple HomeKit. These steps ensure that Vivint HomeKit are securely integrated.
You can, of course, download the Vivint app and control all your devices through it. But without HomeKit, you cannot give voice commands or automate tasks, just like other smart home devices.
ATH Bridge
The ATH Bridge is a plug-and-play solution that comes with HomeBridge pre-installed. It’s an excellent choice if you're looking for a budget-friendly and affordable device. It’s pre-configured and pre-flashed with the HomeBridge server, so all you need to do is download and set up the necessary plugins.
Pros and Cons of ATH Bridge
Pros
- Affordable
- Plug and play easy solution
- Low effort required when setting up
- Simple and easy intallation
Cons
- Installation and configuration can be a bit slow (depending on your personal experience)
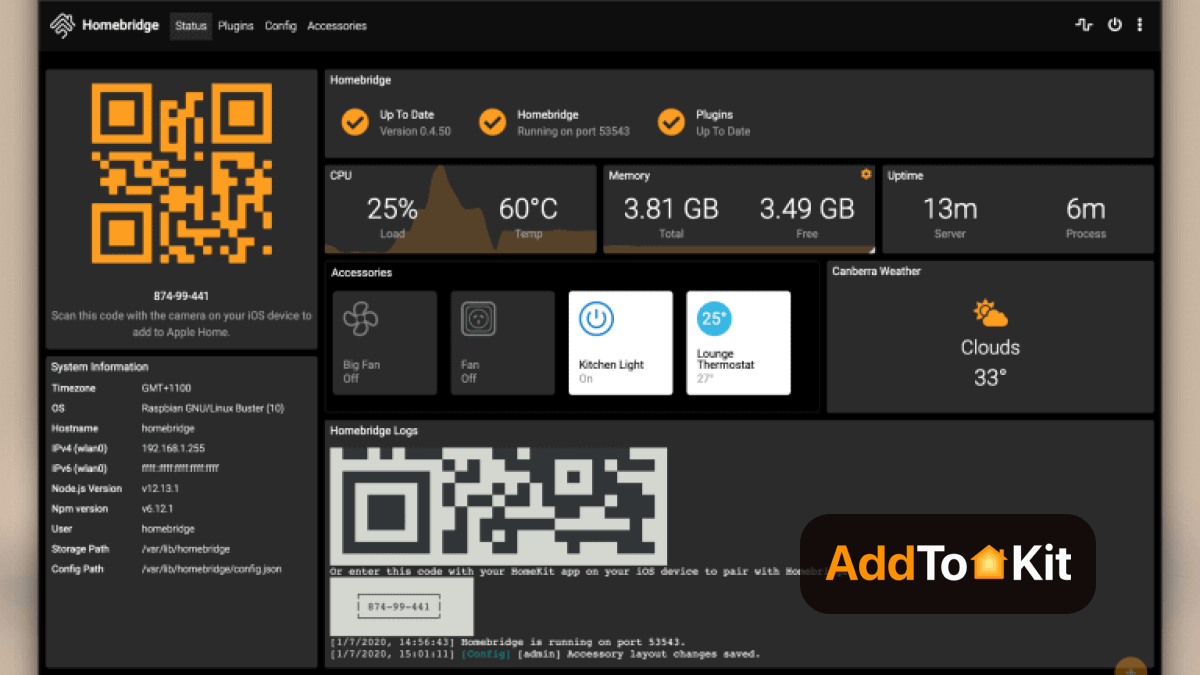
Homebridge: The Software Method
Homebridge is basically a software that can be used to integrate Vivint and HomeKit. This is the most affordable method that can be used.
Pros and Cons of HomeBridge
Pros
- Expands HomeKit Compatibility
- Cost-Effective
- Customizable
- Local Control
- Open-Source Community
- Cross-Platform Integration
Cons
- Technical Complexity
- Time-consuming
- Reliability Issues
- No Official Support
- Hardware Requirements
- Potential Security Risks
- Limited Performance for Large Setups
So, if you want to connect Vivint and HomeKit securely with Vivint Homebridge, follow the instructions below:
- Install and open the Homebridge application.
- Open the ‘Plugins’ from the menu.
- Search for ‘Vivint plugin’.
- Click on it and install the plugin.
- After installation, the configuration process will begin. Do the settings as required.
- When this is completed, the settings will be affected automatically, and now you will be able to control Vivint devices with Siri or an Apple device.
Disclaimer: Third party integrations can be risky and dangerous.
Not only Vivint devices you can also add any devices to HomeKit using HomeBridge solution.
Using HOOBS: A Pre-Programmed Homebridge Server
You can install and use Homebridge from your PC. But it would be best if you kept it turned on constantly, or else it will lose the connection. This is why it is recommended to use a Homebridge server like HOOBS.
Pros and Cons of HOOBS
Pros
- Ease of Use
- Plug-and-Play
- Wide Device Compatibility
- Dedicated Support
- Provide regular Updates
- Cross-Platform Integration
- Local Control
- Customizable
Cons
- Cost
- Limited Flexibility for Advanced Users
- Dependency on Plugins
- Performance Limitations
- Maintenance Required
- Not Officially Supported by Apple
- Potential Security Risks
The setup process for HOOBS is as follows:
- Connect the HOOBS device to the home network through WiFi or an Ethernet cable.
- Browse into http://hoobs.local/ and set up an admin account.
- Add the HOOBS device to the Home app with the ‘add accessory’ option.
- Now look for the plugin section and click on it.
- Use the search option to search for ‘Homebridge-Vivint’.
- Click on install and wait for the process to end.
- Once installed, check for the ‘configure’ button under the plugin and click on it.
- Copy and paste the code below into the console. Make sure you edit the code.
{ { "platform": "Vivint", "username": "your-vivint-user@email.com", "password": "vivint-user-password" } } - Add the relevant data to Vivint to ensure that the plugin works without any problems.
- Click on save and then restart the HOOBS device. Now you should be able to see Vivint products in the HomeKit app.
You can also integrate Honeywell HomeKit using HOOBS solution.
How Vivint and HomeKit match?
Even though Vivint cannot be integrated directly with HomeKit, they work seamlessly once connected. Vivint has all its systems made to be compatible with HomeKit. It allows the users to control the home security system through any device. Overall, the Vivint smart HomeKit is great choice for those who are concerned about home security.
Even Siri can give voice commands to control the Vivint-HomeKit system. Automated features like controlling the lights or setting up routines are also allowed via HomeKit. And apart from using Vivint Smart Hub to view all the footage, you can directly use an Apple device to do the same thing.
Vivint Devices That Can Be Controlled With HomeKit
There are some popular Vivint devices that users love to integrate with HomeKit.
Vivint Smart Lock
This is a door lock that has high standards of security. You can even unlock this door remotely. With an Apple device, the locking and unlocking can also be automated.
Vivint Sky
This is a security camera that can be accessed with an Apple device. You can track the house or the surroundings where this camera is fixed. It also offers you live streaming where you can remotely monitor on events taking around at your place.
Vivint Doorbell
Vivint doorbell comes with a camera. With this, you are able to watch who is at the door and what is taking place around your front area. It also chimes when visitors are there and notifies you.
Perks of Vivint-HomeKit Integration
Apart from voice commands, there are many useful perks that you can get by connecting Vivint with Apple HomeKit.
Automation
You can automate the Vivint smart home devices and also create customized scenes that can control multiple devices at the same time.
Notifications
You will receive notifications when your Vivint devices need attention like when they need an update, or the battery is dead.
Seamless Usage
With Vivint-HomeKit integration, you can experience a seamless control of all the devices within the same interface.
Why HOOBS is Preferred to Connect Vivint and HomeKit?
HOOBS is greatly accessible that it offers all the users to access it. You don’t have to worry about installing Homebridge to it as it comes pre-installed. It’s a hassle-free device that comes with support for most of the devices and there is no need for a special customization.
HOOBS keeps the data private and protected. It has a military-grade encryption with the highest possible security options. And compared to the cost that you will have to spend to keep your PC turned on, HOOBS is convenient and cheap. It also helps to integrate any device with HomeKit and supports with Alexa and Google home.
Vivint is a great option for anyone who is looking for the best home security and monitoring system. When integrating Vivint with HomeKit, it is better to identify the best and the safest ways to connect these two. This will be a great choice if you are planning to automate activities at home for a smooth and seamless run.
FAQs
Deter is a small motion active whistle which will warn the strangers approaching the house that they are being watched.
Yes. The system is built with a wireless cellular connection. So, it doesn’t require WiFi.
It only requires a contract if you choose to finance your equipment over time.
Yes, it can be used without a subscription without opting the benefit of professional monitoring.


